Contact Us

If you still have questions or prefer to get help directly from an agent, please submit a request.
We’ll get back to you as soon as possible.

Please fill out the contact form below and we will reply as soon as possible.

  • Contact Us
  • Home
  • Integrations

Integration with GemPages

Review this guide to set the integration with GemPages.

Written by Polina Tsigelskaia

Updated at March 30th, 2023

Contact Us

If you still have questions or prefer to get help directly from an agent, please submit a request.
We’ll get back to you as soon as possible.

Please fill out the contact form below and we will reply as soon as possible.

  • Getting started
  • Best Practices to set up Growave apps
  • Loyalty and Rewards
  • Reviews
  • Wishlist
  • Social login
  • Instagram
  • Integrations
  • Case Studies
+ More

Table of Contents

How to add Growave to GemPages’ editor Configure Growave

GemPages grants you the power of code without coding. Build as you envision with a versatile Drag & Drop Editor. Quickly create pages of any type by choosing from an extensive template library. Design an amazing brand experience with advanced customizations. Turn visits into sales with built-in conversion boosters. Leverage your marketing campaigns by launching high-performing landing pages. Convert mobile visitors with built-in loading speed optimizations. All in one place, on a visual canvas.

Before you start, make sure you have GemPages installed on your store.

How to add Growave to GemPages’ editor

Step 1: Inside the Editor, open “Library” on the top bar.

Step 2: In the new popup window, select the “Elements” tab and look for the Growave app.

Step 3: Select and install the Growave element by clicking the blue “Add Element” button.

Step 4: Exit the Library and find the 'Growave' element under the 'Third Party' section in the left sidebar.
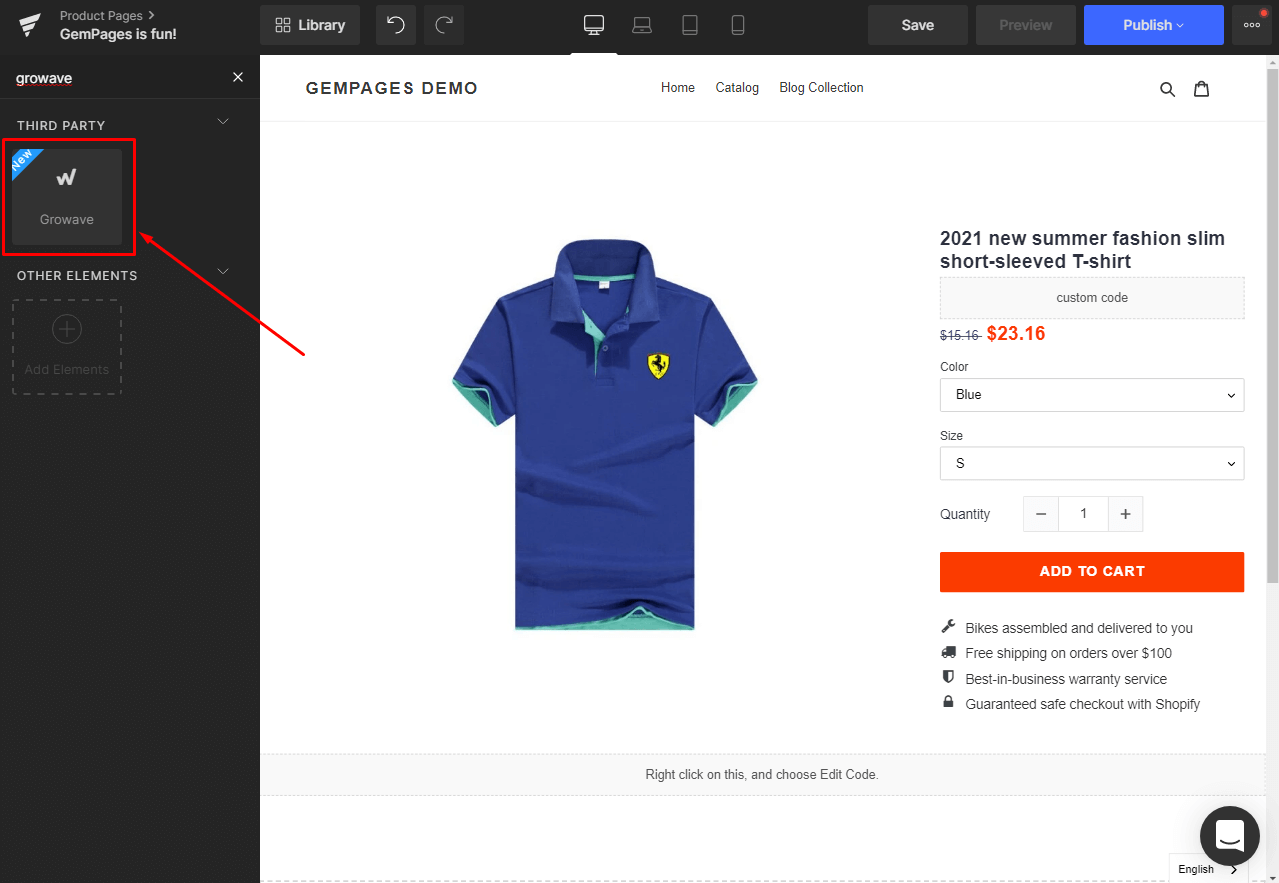
Configure Growave

The Growave app works in conjunction with your products and therefore, the Growave element has to be nested either inside a Product Module or a Product List module.


Step 1: Drag and drop the Growave element onto your preferred spot on the page.

Step 2: Select the type of Growave widget you would like to use out of the 6 available options on your left sidebar:


You may select one of the following widgets:

  • Reviews
  • Star Badge
  • Product List Badge
  • Wishlist
  • Favorite icon

Step 3: Save and preview your changes before publishing the page using the “Publish” button.

That's it!

integrate gempages

Was this article helpful?

Yes
No
Give feedback about this article

Related Articles

  • About the Referral program
  • FAQ on the Reviews app
  • About the Points program
  • Klaviyo: how to use Growave property in the emails
growave-logo

Growave is the all-in-one Shopify marketing platform with powerful tools for photo reviews, wishlists, loyalty programs, referrals, and UGC.

shopifystorebtnimg

Products

Loyalty and Rewards Wishlists Reviews Instagram Social Login

Resources

Knowledge BaseRecommended Themes Live Demo API Documentation Best Shopify Apps Shopify Plus Shopify POS

Company

About Us Partners Legal Center Contact Us
Expand